Bootstrap Chef Node with Knife

Another frequently used command that is easy to forget where the documentation isn’t current.

knife bootstrap <server> -U <username> -P <password> --sudo

As of 2022-01-08, we need to make another update. We must now specify as node name. Who knows why it can’t be inferred. We must also explicitly tell Chef to reuse the password to elevate privileges, which it could also infer.

knife bootstrap <server> -U <username> -N <node> --sudo -P <password> --use-sudo-password

SSH w/o Password

I keep forgetting this when I setup a new Ubuntu server, so here are the steps for automatically logging in via SSH.

  1. ssh-keygen -t rsa
  2. ssh-copy-id username@server
Tell Sublime Text to Forget Tabs on Close

Tell Sublime Text to Forget Tabs on Close

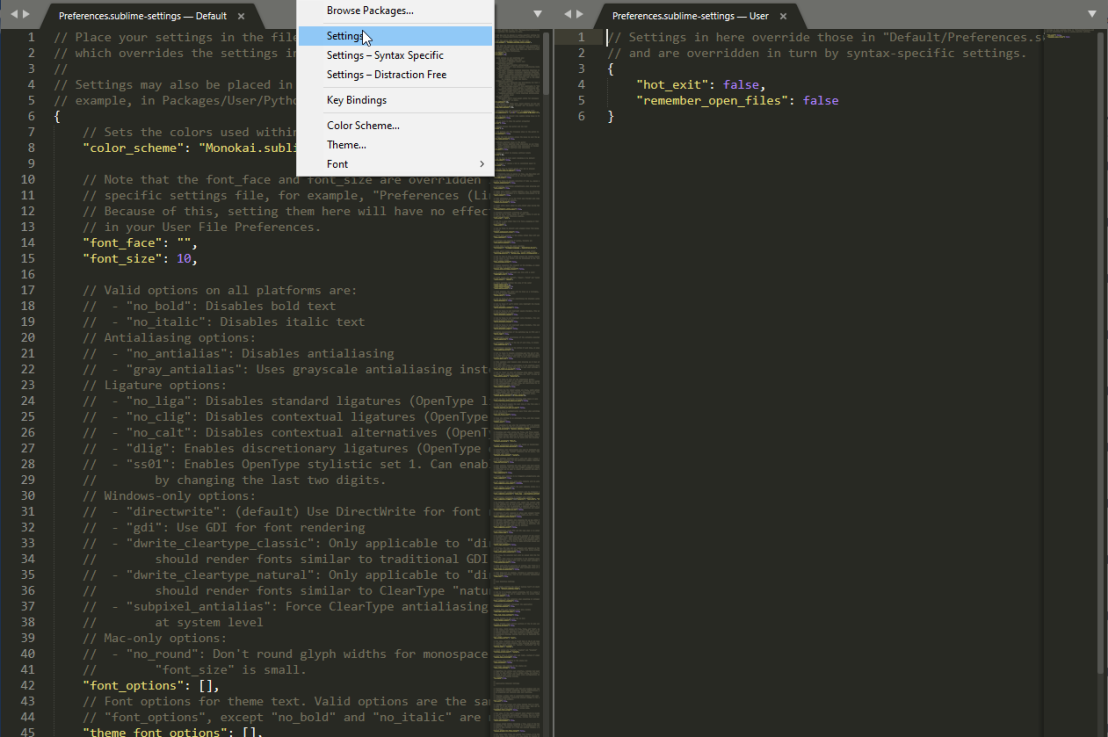
I just built a new computer and installed Sublime Text since I prefer it as my quick edit text editor due to its fast load time compared to Code or Atom. However, it has always annoyed me that it reopens files that were open when the application closed last and it always takes me a minute to remember how to change that behavior. So, for my own future reference go to Preferences -> Settings. You will see two panes now. In the right pane, for user settings, add these two lines inside the brackets:

“hot_exit”: false,
“remember_open_files”: false
Enjoy!


Junior Consultant Qualities

I spent last night in Mexico City speaking to and recruiting Dreamers that have been in a coding bootcamp at <hola-code/>, powered by Hack Reactor,  for the past four months. Many without previous technology experience at all. In that time, they more competent than many that have been in the industry anywhere in the world. I was asked what two qualities were the most important for junior consultants. Without a doubt I settled on curioustity and flexibility.

Curiosity – You must always be wondering what’s next, how it works, how it can be better. Like the early humans that wondered what was over the mountains or across the water.

Flexibility – You must be able to adapt to changing circumstances like team skills and experience, technical requirements, functional requirements, costs, timelines, and most importantly different roles and responsibilities.

Important Languages for Azure

I am in Mexico City this week and spent a lot of time with recent college graduates. They are going through training and getting imersed in the Mobiik culture. They primarily know C# and many asked what languages were important to learn. So, even though Azure has expanded its capabilities, I feel this list represents a balance of not being too many languages with what is truly necessary to be productive. This list is in order or importance to me:

  1. C# – Duh, right? Do I even need to explain this entry? The core to most applications running in Azure will use C#.
  2. JavaScript – Most apps are Web Apps and mobile apps. JavaScript plays in both worlds in addition to the backend for the those Node.js fans.
  3. PowerShell – How do you get those apps in Azure in an automated way? How do automate your environment once the app is deployed? How do you analyze your use and consumption?
  4. Ruby – If you have a large IaaS solution in Azure or any cloud for that matter, you are going to want to deploy a configuration management solution like Puppet or Chef, which are both written in Ruby and knowing Ruby really helps with their development.
  5. Bash – The popularity of deploying Linux in Azure is growing. If you are going to adopt Linux, then Bash skills are definitely required.

It is a polyglot world these days; 1 & 2 are for the development of the app itself, 3 & 4 for managing the apps lifecycle, and 5 for well-roundedness. Once you’ve tackled these, start to look at Python, Java, and Groovy as part of the next set to learn. Embrace development as development and don’t get hung up on one language or environment.

NGINX Docker Container Reverse Proxy

SonarQube dropped native support for HTTPS, so you need to stand it up behind a reverse proxy to serve up SSL. This same procedure can be used to secure anything behind SSL like Jenkins, Confluence, Jira, etc. The other cool thing with this approach is that you can gain higher density in low volume environments by running multiple containers on one host. For example, I access my home instances with the following URLs:

They are all containers running on a single host, reverse proxied by NGINX. This allows me to not have to remember what port a given app is running on and is much cleaner.

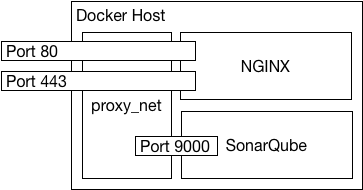
So, today I am going to show how to run SonarQube in a docker container and expose it to the outside world through NGINX running in another container.
docker_nginx_sonarqube

For this implementation, I will be adding config file along with the certificate and key file in the NGINX image. For the SonarQube image we will be setting enviroment variables. Therefore, we need the following 5 files available on the Docker host:

  1. sonarqube.env – This is a key value pair file for the environment variables.
  2. sonarqube.crt – This is the fullchain SSL certificate.
  3. sonarqube.key – This is the private key.
  4. default.conf – This is the default site configuration file for NGINX.
  5. docker-compose.yaml – This is the docker-compose file to bring everything up easy.

The sonarqube.env looks sort of like this:

SONARQUBE_JDBC_USERNAME=sonarqube
SONARQUBE_JDBC_PASSWORD=notmypassword
SONARQUBE_JDBC_URL=jdbc:postgresql://postgres.madridcentral.net/sonarqube

The NGINX default.conf file is a straight forward reverse proxy config. We redirect port 80 to 443 for HTTPS and proxy_pass to the container name and the appropriate 9000 port.

server {
 listen 80;
 listen [::]:80;

 server_name sonarqube.madridcentral.net;

 return 301 https://$server_name$request_uri;
}

server {
  listen 443 ssl;
  listen [::]:443 ssl;

  server_name sonarqube.madridcentral.net;

  ssl_certificate /etc/ssl/certs/sonarqube.crt;
  ssl_certificate_key /etc/ssl/private/sonarqube.key;

  access_log /var/log/nginx/sonarqube.access.log;

  location / {
    proxy_set_header Host $host;
    proxy_set_header X-Real-IP $remote_addr;
    proxy_set_header X-Forwarded-For $proxy_add_x_forwarded_for;
    proxy_set_header X-Forwarded-SSL on;
    proxy_set_header X-Forwarded-Host $host;
    proxy_pass http://sonarqube_container:9000;
    proxy_redirect off;
  }
}

For the docker-compose file, we require version 3.5 of the format for setting the user defined network name. I am setting it to proxy_net in this example. Docker has deprecated links so this is the preferred way to get containers to communicate and resolve each other using their container names.

version: "3.5"

services:
  sonarqube_container:
    container_name: sonarqube_container
    image: sonarqube
    networks:
      - proxy_net
    restart: always
    expose:
      - "9000"
    env_file:
      - sonarqube.env

  reverse_proxy:
    container_name: reverse_proxy
    depends_on:
      - sonarqube_container
    image: nginx
    networks:
      - proxy_net
    ports:
      - 80:80
      - 443:443
    restart: always
    volumes:
      - /etc/madridcentral/default.conf:/etc/nginx/conf.d/default.conf
      - /etc/madridcentral/sonarqube.crt:/etc/ssl/certs/sonarqube.crt
      - /etc/madridcentral/sonarqube.key:/etc/ssl/private/sonarqube.key

networks:
  proxy_net:
  name: proxy_net

Now we can use the following command to bring it all up:

docker-compose up -d

We should see something similar to the following:

docker_nginx_sonarqube_terminal

Packer Ubuntu Boot Command

I’ve seen lots of examples on the Internet of Ubuntu installer boot commands for use in Packer. They appear to be derived from the same source and that’s fine, but they aren’t optimized and some comments about what are required are inaccurate. There are two reasons to minimize the boot command:

  1. Time – It takes time to enter the boot command over the VNC connection even if it automated. This affects the fix/test cycle time.
  2. Duplication – Options in the boot command can be specified in the preseed file. You either need to update both spots of wonder which value will be taken.

This is the command I use:

"boot_command": [
"<esc><wait>",
"<esc><wait>",
"<enter><wait>",
"/install/vmlinuz",
" initrd=/install/initrd.gz",
" auto=true",
" priority=critical",
" url=http://{{ .HTTPIP }}:{{ .HTTPPort }}/{{user `preseed_path`}}",
"<enter>"
]
I believe this to be the absolute minimal Ubuntu install boot command for Packer. I minimize the use of <wait> to speed the process. For the options I do supply, I use the shortened alias to speed the process as well. The use of auto=true defers the keyboard and locale questions to after the preseed file is loaded by the installer and priority=critical suppresses remaining questions that will eventually be answered in the preseed file like hostname.
A couple of other items, make sure you use the Alternative CD image and not the Live CD and boot your VM using BIOS and not EFI. For Ubuntu 18.04.1 Server AMD64 use this URL: http://cdimage.ubuntu.com/releases/18.04.1/release/ubuntu-18.04.1-server-amd64.iso

Resolve ESXi NFS Mounting Issue

I changed my network configuration at home a while back and when I went to create a new Chef Server VM in ESXi I was unable to find my software datastore with my Ubuntu 16.04 ISO. I tried mounting my NFS volume through vCenter and it failed. I then went directly to the ESXi web client and it failed as well. I’ve seen inconsistencies in the GUI versus the CLI so I SSH into my server. I try mounting my NFS volume and it fails:

esxcli storage nfs add --host=<myhost> --share=<myshare> --volume-name=<myvolume>

Unable to add new NAS, volume with the label software already exists

As any other IT person would do I google the response and found this super helpful post: https://www.bussink.ch/?p=1640

It alerted me to the issue and resolution but needed to be updated for ESXi 6.5 instances. So, now you remove the hidden volume with this command:

esxcli storage nfs remove --volume-name=<myvolume>

Then you are free to remount and carry on about your business.


Debugging Packer Azure-Arm Builder

Getting a Packer build run to complete successfully can be challenging. Getting the write combination of template configuration and scripts is always a challenge. If you stuck trying to get here are a few tips.

Turn on Logging

Enable Packer logging by setting a few environment variables. Set PACKER_LOG = 1 and enter a file path for PACKER_LOG_PATH.

Prevent Cleanup on Error

Inform Packer that it should ask you what to do when it encounters an error instead of just immediately cleaning up all the resources it created.

packer build -on-error=ask mytemplate.json

Log into VM

If examining the log file isn’t enough to resolve the issue, you can leverage our ability to prevent cleanup and log into the VM. So, what is the password? Well the password is not dumped into the console output, which is just fine. You need to open the file at the path you specified for PACKER_LOG_PATH. Once you have that open you can search for “adminPassword” and grab the value that immediately follows it.

\"parameters\":{\"adminPassword\":{\"value\":\"THIS_IS_THE_PASSWORD\"}

Download blob from Azure in PowerShell without AzureRM

This is an edge case, but not edge enough where people aren’t posting about it. Sometimes you don’t want to take an additional dependency and jump through hoops to get AzureRM installed on a machine and functional. This could entail getting the right version of PowerShell, setting permissions to access the PowerShell Gallery, etc. In my scenario, I’m using Packer to create images for Azure and needed to get a third-party installer on my image. So, I uploaded my assets to Azure and only needed to pull them down. I could have hosted my own web server and accessed the files over HTTP/HTTPS, but this was the path of least resistance. When I started down this path, I came across this page:

https://docs.microsoft.com/en-us/rest/api/storageservices/authentication-for-the-azure-storage-services

This page is more specification than how-to document, so there are plenty of comments saying they didn’t understand and other helpful visitors posted their examples. I also came across this page, that does a great job of outlining the process in various language but not PowerShell:

https://tsmatz.wordpress.com/2016/07/06/how-to-get-azure-storage-rest-api-authorization-header/

Taking their lead, I decided to put everything together in a nice and clean PowerShell function that you can use in your own scripts or modules. Enjoy.

function Get-BlobFromAzure {
    [CmdLetBinding()]
    param (
        [Parameter(Mandatory)]
        [string]$StorageAccountName,

        [Parameter(Mandatory)]
        [string]$StorageAccountKey,

        [Parameter(Mandatory)]
        [string]$ContainerName,

        [Parameter(Mandatory)]
        [string]$BlobName,

        [Parameter(Mandatory)]
        [string]$TargetFolderPath
    )

    $verb = "GET"
    $url = "https://$($StorageAccountName).blob.core.windows.net/$($ContainerName)/$($BlobName)"
    $xMsVersion = "2015-02-21"
    $xMsDate = [DateTime]::UtcNow.ToString('r')
    $targetFilePath = Join-Path -Path $TargetFolderPath -ChildPath $BlobName

    $canonicalizedHeaders = "x-ms-date:$($xMsDate)`n" + `
        "x-ms-version:$($xMsVersion)"

    $canonicalizedResource = "/$($StorageAccountName)/$($ContainerName)/$($BlobName)"

    $stringToSign = $verb + "`n" + `
        $contentEncoding + "`n" + `
        $contentLanguage + "`n" + `
        $contentLength + "`n" + `
        $contentMD5 + "`n" + `
        $contentType + "`n" + `
        $date + "`n" + `
        $ifModifiedSince + "`n" + `
        $ifMatch + "`n" + `
        $ifNoneMatch + "`n" + `
        $ifUnmodifiedSince + "`n" + `
        $range + "`n" + `
        $canonicalizedHeaders + "`n" + `
        $canonicalizedResource

    $hmac = new-object System.Security.Cryptography.HMACSHA256
    $hmac.Key = [System.Convert]::FromBase64String($storageAccountKey)
    $dataToMac = [System.Text.Encoding]::UTF8.GetBytes($stringToSign)
    $sigByte = $hmac.ComputeHash($dataToMac)
    $signature = [System.Convert]::ToBase64String($sigByte)

    $headers = @{
        "x-ms-version" = $xMsVersion
        "x-ms-date" = $xMsDate
        "Authorization" = "SharedKey $($storageAccountName):$($signature)"
    }

    Invoke-RestMethod -Uri $url -Method $verb -Headers $headers -OutFile $targetFilePath
}